
(Probably) The Most Complete Beginner’s Guide To Web Dev
Or, Full Stack For People Who Know Nothing About Full Stack
What we’re going to do here is make a full stack web app that runs on your local server.
What does that mean?
It means you’ll have a BackEnd (the server) and a FrontEnd (the client), and they’ll be connected. In more practical terms that means you’ll have a website that is capable of storing data about individual users and displaying different data according to the user requested. Think a very, very (very) simple version of Facebook.

For the server, we’ll use node.js and express and the client will run on the EJS templating engine. We’re going to have a mysql database and Google Authentication sign in. Finally, we’ll use Javascript and Query to get the front and back ends talking.
Who am I?
Not so long ago I was exactly like you, with no idea about web dev. Most of the guides out there assume a level of knowledge that you don’t have when learning the first time, so I’m here to lower the ladder behind me a bit and take you by the hand through it all.
Caveats
I am not an expert. It’s likely there are better, more efficient ways of achieving what we build here. However the principles are solid and overall if you can understand everything done here you will be a long way towards building your own web app. If you want to be sure what you’re learning is 100% best practice I suggest you pay for a web dev bootcamp.
Scope
Web apps are hosted on a server — the ‘brain’. This server can your own computer or in an Amazon data centre or somewhere else. You’ll notice that throughout this guide I use a localhost — meaning we I use my own computer. As such this web app isn’t connected to the internet, it only exists within the reach of my localhost server, which is to say, my computer. We call this development, spinning the server up to an online host (like AWS) would put it in production. The skills of web dev are learnt in development, as such we do not consider production here.
This guide is designed for mac users. It’s should also be helpful for Windows users, but there will likely be some additional Googling you’ll need to do, in particular to set up your tools.
Code repository
Here is the link to the final version of this project- you can download the final version of all files here
CONTENTS
1. Introduction — Tools
2. Build the brain: The Server
2.1 Installation
2.2 First lines of code
3. Build the brain: The routes.js File
3.1 Build the brain: Building Understanding
4. Learning to smile: Connecting The Brain To The Face With routes.js
5. Using Google Authentication For Sign In
6. Memory: Creating A Database
7. Learning to remember: PUSHing Data To the Database
8. Building Your App
8.1 View a profile & sign in
8.2 Edit a profile
8.3 Sign out
9. Pretty face: How It Should All Look
10. Appendix: Further Reading & Resources
1. Introduction
Tools
Visual Studio Code
If you don’t have VS Code, download it now. It’s the best editor for writing code.
The Terminal
This is the terminal- otherwise known as the console. If you haven’t used it before it can be a scary place. And it is. But it’s also very handy and once you learn just a few commands you’ll be able to smoothly navigate through it.
If you’re on windows, you will have to download git bash
You can use ls to see ‘list’ the contents of the folder you’ve just navigated to

Git
I used Git and Github extensively for this project. You don’t need it if you don’t want, but it is where all my code is stored and where you will go to find the final version of this project. Being at least aware of Git/Github is important for beginners.
2. BUILD THE BRAIN: THE SERVER
Getting setup
It’s a fact of coding life that downloading and installing the tools you need to run your code is as hard as any actual coding problem you’ll later face. The frustrating part is that when you’re downloading these things you’re necessarily a beginner and have no fucking clue what you’re doing. While this does equip you well with the crucial Google It approach to solving coding problems, it can be tough getting started, so I’m going to try make it as easy as I can.
2.1 Installation
Location: Terminal -> I’m going to use these ‘location’ flags throughout to help keep you orientated to which tool or file you should be in
Node.js- The most important tool
Note, the list below is a summary of this guide*
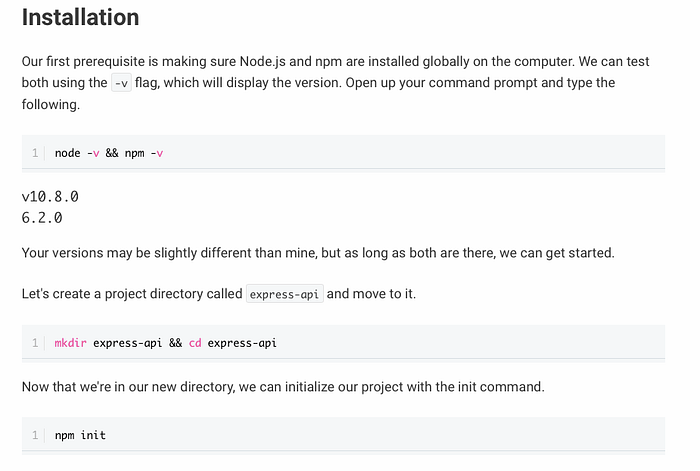
- Download node.js installer (Mac or Windows) here.
- Check it was installed by typing
which nodeinto the terminal, then typenode --version— you should see something like the following
$which node
/usr/bin/node$node --versionv12.15.0
*If these steps don’t work, I also found this guide in the WhatsApp chat history with the friend who helped me get started on all this. Finally, if all fails you could try the official node installation.
You don’t need to exactly know what node is or does- but it is basically the thing lets your javascript code run- underpinning the ‘brain’ in the schema above. Once node is installed you need to navigate to a folder in the terminal. For example you can do something like the following:
Navigate to desktop
cd Desktop
Make a new folder in the desktop (you could also easily just do the standard way and right click- but it’s good to get basic fluency in the terminal as we’ll use it a lot)
mkdir WebDev
Navigate into this folder (obviously you can name it whatever you like)
cd WebDev
Then initialise node
npm init
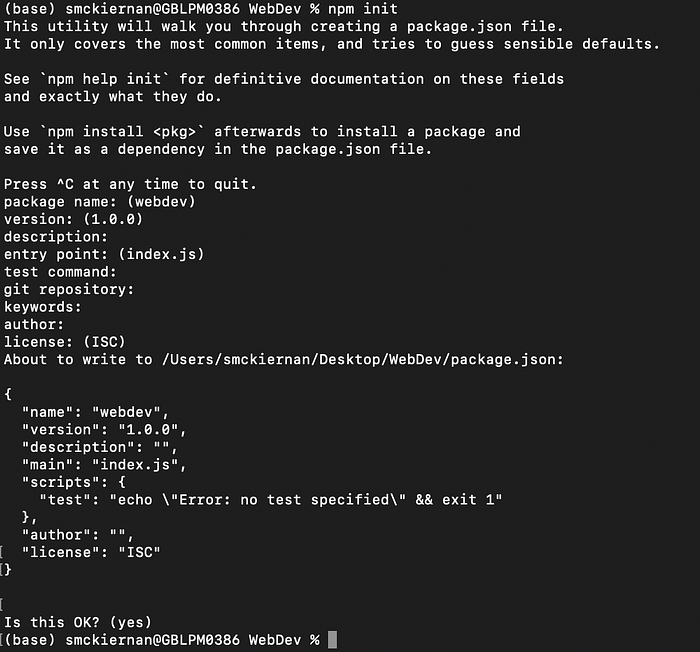
This is what the above should look like for you. Once hit enter on npm init , just keep pressing enter — this means you accept the default options for your node app, which is fine.
For extra help on getting your server set up: read the guide below
Now we need to install the rest of the tools (packages) we’re going to use: Copy & paste all these install commands in one go into your terminal (always in the same folder- WebDev)
npm install express
npm install google-auth-library
npm install request
npm install mysql                                                 npm install ejs
npm install body-parser
Aside: For a good explainer on node, see the first 10 mins of this video
2.2 FIRST LINES OF CODE
Congratulations, if you’ve gotten this far you’re now ready to start writing some code!
As noted in the introduction, one of the tools we’ll be using is VS code- this is definitely the best and most common code editor out there, so just make your life easy and use it.
Lets, create a new file in VS code and call it server.js — and again (and always), just make sure you’re in the WebDev folder that you created above.
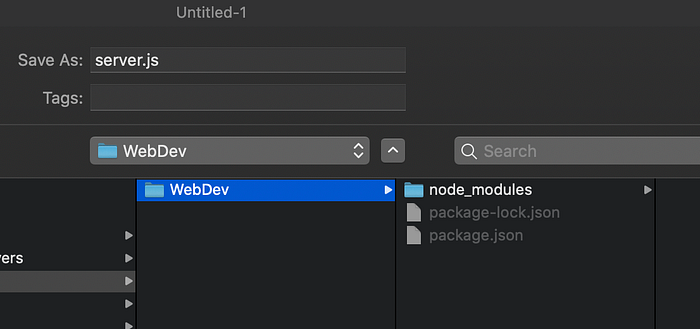
Location: server.js
server.js( jsmeans this is a javascript file; we’ll be using javascript a lot)
Comments in javascript:
// Two forward slashes ("//") creates comments in javascriptDefine some variables to get started
What’s going on here?
It’s hard to grasp at the start, but basically you’re saying, we require a tool called express and when we write express later in this file, that’s the tool we’re referring to — which you actually can see on the next line, when we define our app to be express(). Next we set the port — I kind of think of this like a post box; it’s where we locate our server (80 is the default value). And then path like express above, is just another tool we’ll use.
Code to start the server
Don’t worry too much if you don’t get the javascript for the moment. It looks messy when you first get started. But even if you don’t understand much, I’d advise you don’t copy & paste — it’s amazing how much more you learn by writing code out yourself.
Location: Terminal
Let’s launch the server! We use the command node and the name of the server filer we just created.
node server.js
Alright, if you’ve made it this far you have created a server on your computer! A legitimate next question might be “what’s a server?”.
Well, the server will basically be your website’s brain. The client, or FrontEnd might be considered your website’s face. The brain (server) sends emotions (data) to the face (client) which then smiles or frowns. The most basic clients aren’t dynamic, so don’t need servers- they never change. These are based on HTML files. However because we’re making our page dynamic, we’re going to use EJS. EJS is a templating engine one and of the simple ways to make dynamic webpages (or ‘faces’). You may have heard of React or Vue etc; these achieve the same thing, but work differently and are beyond our scope.
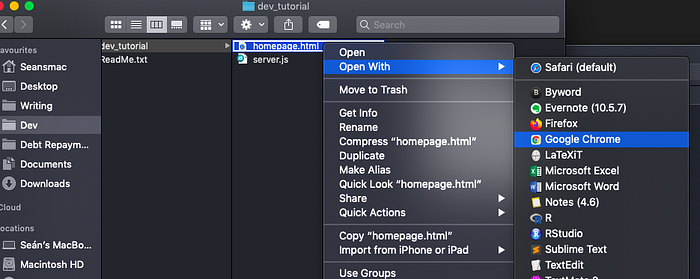
Location: homepage.html
Back in your Vs Code editor, open a new file called homepage.html and save it in the same folder as your server. Ok, so if you were paying attention in the previous paragraph, you’ll know that creating a html file means we’re creating a static website, which kind of defeats the whole purpose.
For the moment that’s fine, we’re just going to get this page up and running in the browser first and then work on making it dynamic. So the first thing you need to do is add some basic HTML code.
Cool, let’s see what that looks like in a browser; right click it in Finder and open it in a browser

Let’s stake stock
So, what we have so far is two disparate elements of our web app; first we got the server running — our BackEnd and then we wrote a simple html doc, which is the beginning of our FrontEnd.
Now we want to connect the two- we want to host the html page on the server. This isn’t going to change how it looks, but it will change where the file gets loaded from. If you look at the address bar of your html page in the browser, it just shows you a file path, which isn’t very impressive looking. What we’re going to do is swap this so that the data gets called from the server, which is what happens on the real internet.
Because we’re using a local server, we’re going to be using localhost. But if you were using an Amazon server to host a real website that’s online the principles are exactly the same
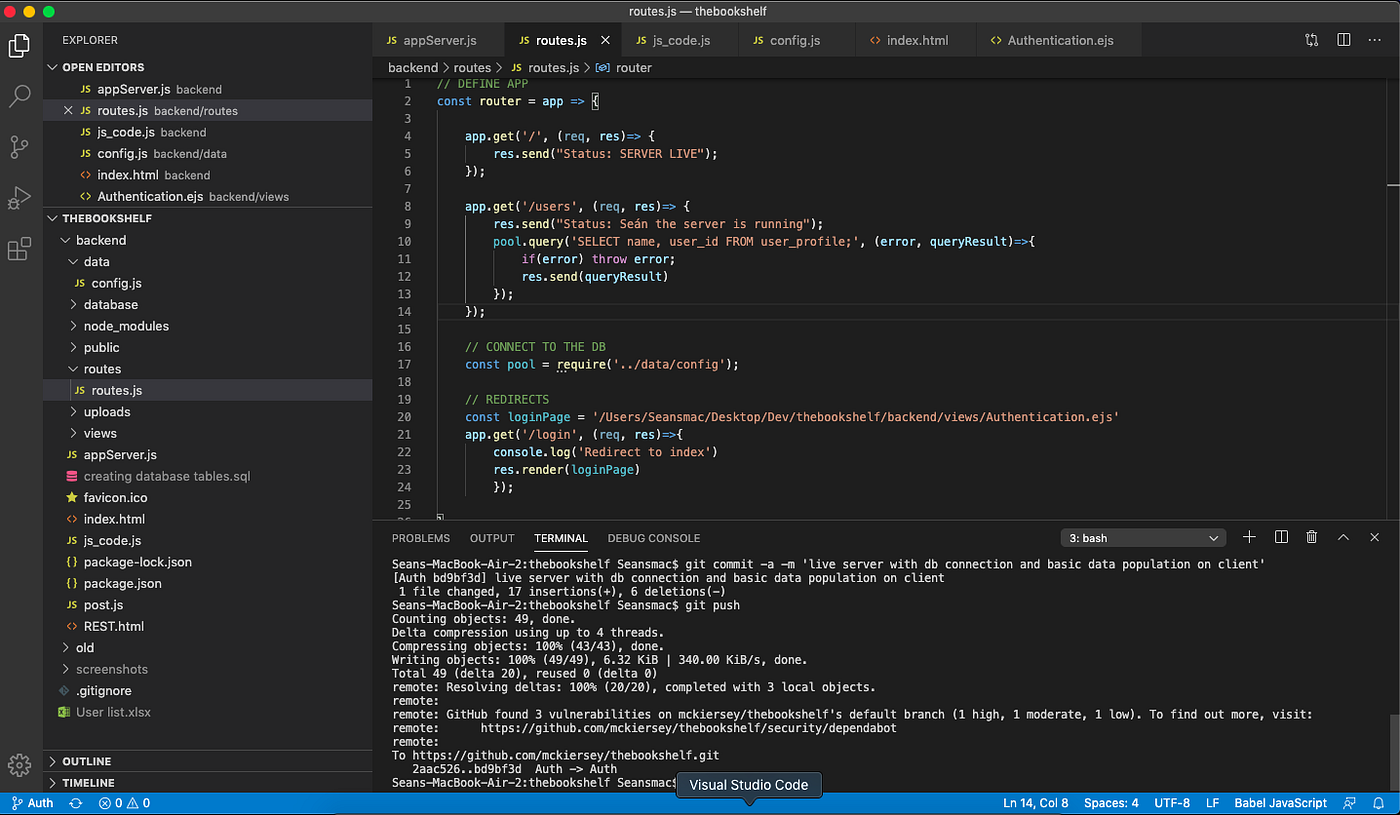
3. BUILD THE BRAIN: THE ROUTES.JS FILE
Location routes.js
Head back to VS Code and make a new file called routes.js, write the code you see below into this new file
You can write anything you like where the text is, feel free to play around with it- it’s often fun to write your name. Doing this is also a good way to build understanding about how these mechanisms all interact.
Location: server.js
Let’s now go back to the server — at the moment our routes file is stranded, untethered out in the wilderness of your project. We need to make sure your server knows where it is. It’s only two lines (basically you’re telling the server where the routes.js file is, and then you’re telling it to use the routes.js file)
Location: Terminal
Ok back to the terminal and start your app again:
(just in case it’s still running from last time, use ctrl + c to end the last session)
node server.jsNow open up a new window in a web browser and type in the following:
http://localhost:80/With any luck, here’s what you’ll see!

3.1 BUILD THE BRAIN: BUILDING UNDERSTANDING
Skippable: Let’s build a little understanding
Feel free to skip this part, but if you’re not tremendously clear on what’s going on, you should make a few more server get requests. If you’ve been copy and pasting up to this point, I’d encourage you to read and type instead- it’s amazing how much you learn by typing verbatim someone else’s code.
Ok, first of all, let’s turn off the server: ctrl + c
Location routes.js
Right, let’s go back now to the routes folder- this is where we do our get requests. You know the way you use “/” to navigate to various parts of a website? That’s basically what we’re building in the routes folder with these get requests.
Add this directly under the first get request (line 7 in the code snippet above)
app.get('/lyrics', (request, response)=>{
        response.send("And that smell of sweet perfume comes drifting through The cool night air like Shalimar")
    });
Save that, then start your server again (node server.js). Go back to your browser and type into the address bar
http://localhost:80/lyricsYou should see the lyrics from Madame George. And if you do it again, so stop the server, add in the following code into routes.js, save the changes and restart your server
app.get('/name', (request, response)=>{
response.send('hey [put your name here], are you getting the hang of this yet?')})
The thing to retain from this is that these messages are coming from the server. But we don’t have to display just messages, the key point is that we can display lots of things, including pictures, video and whole html files.
4. LEARNING TO SMILE: CONNECTING THE BRAIN TO THE FACE WITH ROUTES.JS
Back to the narrative: Using the server to display our html file
So, still in the routes file, we’re going to add a new get request
Location routes.js
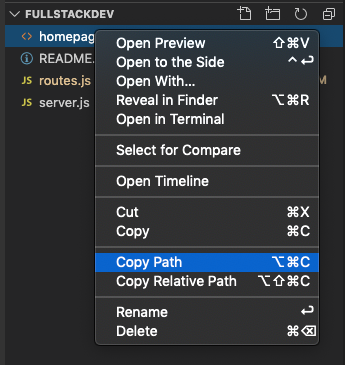
Don’t just copy and paste this, as you can see, the file path is where the html file is stored on my computer. You need to change this path to your computer- see below.
To get your file path, right click (either in Finder or Vs Code and copy the path)
Once you’ve done that, we do our little server dance again. Make sure it’s stopped (ctrl + c in the terminal), save the changes in routes.js, start the server ( node server.js) and then go back to your browser. This time type this into the address bar
http://localhost/homeAnd you should see the html page from before. This time you’re not simply loading a file like you would in Word or Excel, but it’s coming from your server, via the router. The difference is subtle, but now that this html file is being hosted on a server, all you’d have to do is swap your local server to an online server and you could already have your little html webpage online!
And just to be really clear about things, let’s add some content to the HTML file.
You don’t necessarily have to restart your server to see these changes, just make sure the html is saved and reload your webpage.
5. USING GOOGLE AUTHENTICATION FOR SIGN IN
This isn’t strictly part of the core skeleton a full stack web app, but it adds a bit of professionalism to it- and realistically, if you want to build anything that has users and passwords, you need to have professional grade security.
Luckily it’s actually pretty straightforward to do, we’ll be mostly following Google’s own guide to do this. Also, while this video tutorial is slightly out of date, it’s pretty well done and good for a lazy watch. As the Google guide is pretty thorough, I’m not going to do this part in much detail.
Step 1: Read Google’s guide
https://developers.google.com/identity/sign-in/web/sign-in
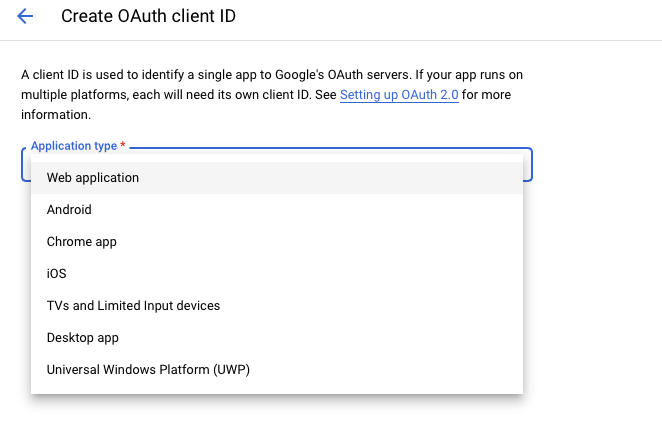
Step 2: Create credentials

Step 3: Select web app
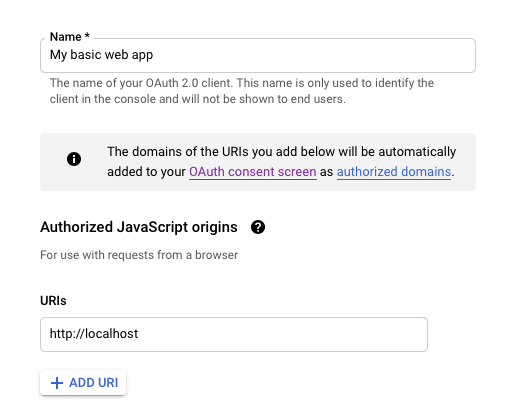
Add a name and copy/paste your localhost into the Authorised JavaScript origins box:
http://localhostStep 4: Click the OAuth consent screen tab

Step 5: Make your app an external one (though for our purposes it probably doesn’t really matter)
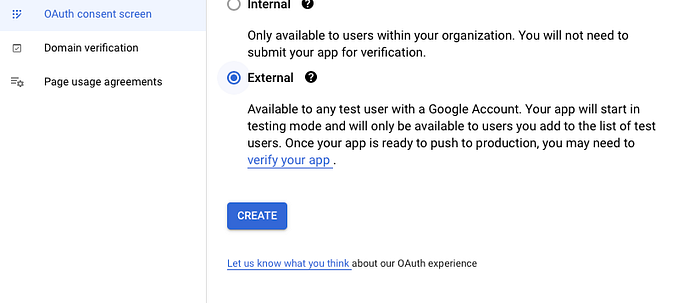
Step 6: Put in a name and your email address

Step 7: Click on ‘Add or Remove Scopes’ and add user email and user profile

Make sure to scroll down all the way under the check-boxes and click Update, then Save & Continue
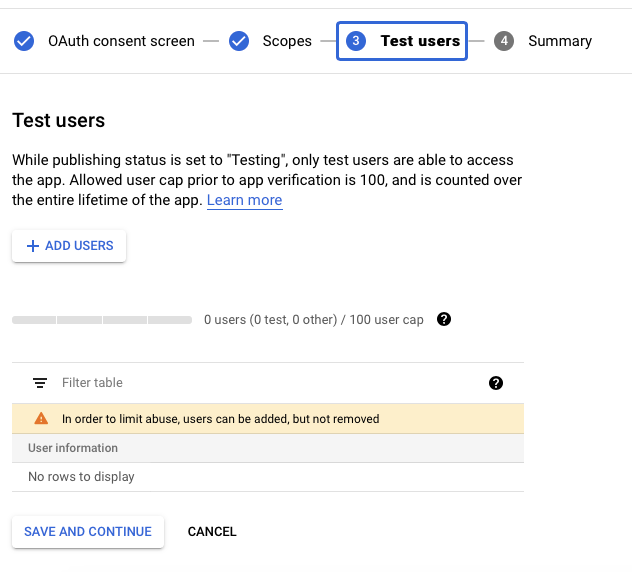
Continue again on the Test users part
Step 8: Back to VS Code
As instructed in Google’s guide, we need to add the following code to our page. Copy your client ID from here

Location: homepage.html
and paste it here
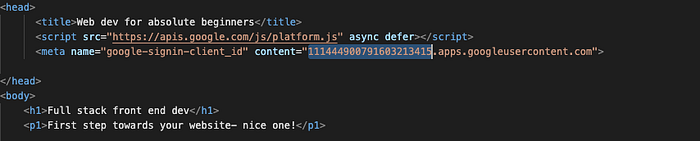
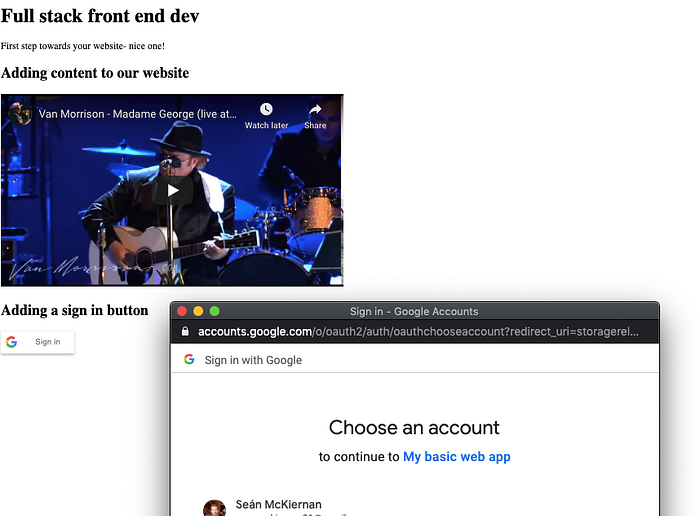
Add a sign in button, Google kindly give you the code to do this
<div class=”g-signin2" data-onsuccess=”onSignIn”></div>Taken together, you should have something like this
If you restart your server (again, ctrl +c and then node server.js), your website should be starting to take shape!
6. MEMORY: CREATING A DATABASE
We need to create the ‘memory’. This is going to seem a little abstract, and you can get software to make things a bit more concrete if you like, but ultimately I think that probably distracts from the mechanisms, so we’ll stick with the bare bones, abstract approach.
Location: Terminal
EDIT: An alternative (and probably easier) way to install mysql for Mac
- Install homebrew (Mac only — takes five minutes or so)
- Use homebrew to install mysql:
brew install mysql3. Then run the other steps, as follows
brew install mysql-server
sudo mysql_secure_installation
mysql.server start
4. Run sql
mysql -u root -pEnter the password you chose in step 3 when you’re prompted in step 4.
First of all, install mysql — you can follow this linked guide (also this seems like a simply way to get set up). This part is a little harder to write as I’ve had this installed on my computer for years and can’t remember exactly how to do it. So instead I’ve found what looks like a good resource. If it doesn’t work, check StackOverflow or Reddit (and please comment below if you find a better solution!)
sudo apt update
sudo apt install mysql-server
sudo mysql_secure_installationTo get mysql running type:
mysql -u root -pThen when prompted to enter the password, write (note, the terminal doesn’t show you’ve typed characters when writing passwords, i.e. it doesn’t show ** or anything)
root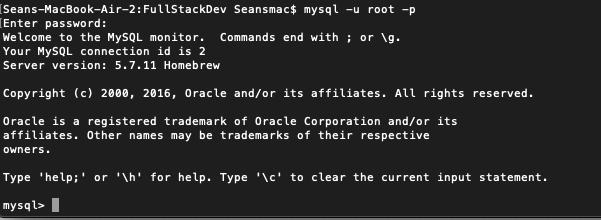
Quick aside on SQL for those unfamiliar:
SQL is a ‘query language’ used in companies basically everywhere. It’s a simple and highly logical language that allows the user to extract from a data base. The basic syntax is as follows:
SELECT [variable_1], [variable_2]..., [variable_n]
FROM [database_name]
WHERE [variable_n] = [some condition];
(and obviously, you press ENTER to launch the SQL command)
So, for example
SELECT user_name, user_email
FROM full_stack_database
WHERE user_age = 29;
Creating our database
show databases;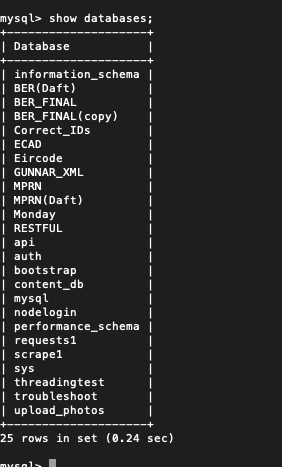
I’ve a load of other databases in there from other projects and learning/testing, but you should still see one or two default DBs.
We’re going to create a new one as follows:
CREATE DATABASE fullstack_db;
Easy peasy

This is our database for this project, within in the database you can have as many tables as you want.
Let’s first make sure we’re using the database we just created
use fullstack_db;…and then create a table in the database.
CREATE TABLE `user_profile` (
 `user_id` int(11) unsigned NOT NULL AUTO_INCREMENT,       `google_user_id`   varchar(50)   DEFAULT '',
 `first_name`      varchar(50)   DEFAULT '',
 `full_name`       varchar(50)   DEFAULT '',
 `email`           varchar(50)   DEFAULT '',
 `profile_picture` varchar(1000) DEFAULT '',
  PRIMARY KEY (`user_id`)
) ENGINE=InnoDB DEFAULT CHARSET=utf8;
Copy and paste the above into mysql in your terminal as follows:

What you’re doing here is defining an empty table- I like to think about this as a warehouse. You need to create all the shelves in the warehouse to the exact specification so that they match the delivered goods and everything fits. In this case, the goods are data and the shelves are fields (columns).
Let’s add a second table, this one for the user’s content that they will add.
CREATE TABLE `user_content` (`content_id` int(11) unsigned NOT NULL AUTO_INCREMENT,
  `user_id` int(11) DEFAULT NULL,
  `content` varchar(500) DEFAULT NULL,
  `content_type` varchar(500) DEFAULT NULL,
  `content_desc` varchar(500) DEFAULT NULL,
  `content_position` int(11) DEFAULT NULL,
  PRIMARY KEY (`content_id`)
) ENGINE=InnoDB DEFAULT CHARSET=utf8;--
To get out of the mysql framework, type (and if you make a mistake, simply DROP TABLE user_profile; and start again- simple)
exitLet’s take stock
We have an empty database, meaning we have somewhere to put the data, but now we need to figure out where that data comes from, and then we need a way to get this data actually into the database. First let’s get the data and we can come back to inserting it into the database after.
7. LEARNING TO REMEMBER: PUSHING DATA TO THE DATABASE
7.1 Getting the data
What data are we going to use? Well, in the table we made above we have a user_id field, a name field and a profile_picture field. Let’s fill in those fields.
Location: homepage.html
And just to be clear, here I’m literally following Google’s guide and copy/pasting their code. This code is written in javascript, so we have to use the script tags to tell the browser that this is javascript, as you can see in the code snippet below.
Once you have this copied in and saved, go ahead and refresh your browser (this isn’t a server side change, so no need to restart the server). Now open the developer tools (Safari: option +command + c; Chrome: option + command + j) and once you click sign in you should see the info about your Google account printed in the console!

To see what’s going on here, let’s play around a bit with printing things in the console. Add the following code on line 22 of homepage.html
console.log("This is a message BEFORE extracting my Google data")and add this on line 30
console.log("And this is a message AFTER extracting my Google data")and add this anywhere you like between the two <script> tags
console.log('and here's a message about nothing')Now, same again, save the html file and refresh the page
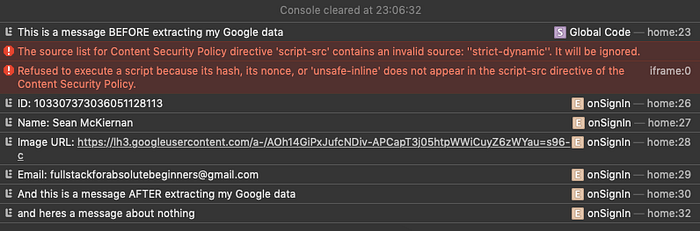
What should be clear now is that console.log is just a print statement and as long as you put it in between a <script> tag you can print out anything you like in the browser console.
Location: config.js
Create another new file, this time called config. In this file we are configuring the link to the memory- in this case our mysql database, called fullstack_db.
Simply put, the config file configures the connection to the database. You can see on lines 6–9 we put in the details of the database that we made earlier. This is quite technical and you don’t really need to understand the details of what’s going on.
Location: server.js
We also need to add a few lines into our server file, which will enable the all the connections we’re about to build actually work.
8. BUILDING YOUR APP
We’ll do this in three sections. I’ve made a visual schema for each section to help get a global overview on what’s happening with the code.
- View a profile & sign in
- Edit a profile
- Sign out
8.1: View a profile & sign in

Click here for full diagram
Location: homepage.html
Now that we’re in the home stretch, we’re going to go back a little on the previous work we’ve done to make things a little more professional. Before it was all about getting things working, now it’s about delivering something that is very close to a real web app.
First, let’s simplify the homepage. Later we’ll add CSS, so don’t worry if it looks a bit shit at the moment.
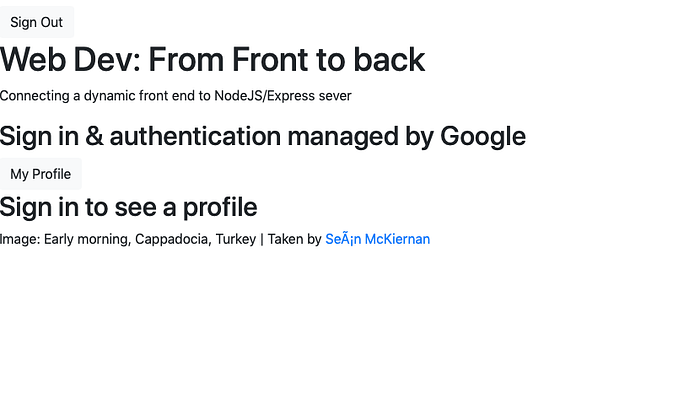
The code below will build this page. Two things to note: We have added jQuery & Bootstrap. The bootstrap is only used to format the buttons used, jQuery will be used later on when we add Javascript to this page.
Here we add the Javascript to the homepage. You can see that the code written below corresponds with that is in the diagram at the beginning of this section. Let’s dig into it:
GetCookieVlaue
We define this function which we use later to get the value of a cookie that has been stored in the browser. A good example of this being used is in the Session status code block, which checks whether there is any value associated with the cookie USER_SESSION_TOKEN.
onSignIn
We’ve seen this before, except here it’s a little more industrialised. This function gives us the user’s google id (id_token) and POSTS it to the BackEnd. This function gets triggered by the SignInButton which is in the code snippet above.
ProfileRoute
This is a POST request- it sends (posts) the cookie from the browser to the BackEnd, if this token is confirmed as being valid, we get redirected to the user’s profile page via the code:
window.location.href = ProfileUrl
SignOut
We’ll come back to this one later.
Aside: What is a token?
The token is the workhorse of authentication. Think of it like a stamped ticket, if you have a ticket and it’s valid (i.e. hasn’t expired and is for the right train/ride etc.) then you can get access. This article gives a good overview. As you’ll see below, the token gets bounced around from Google (in this case), the server/backend and the browser/front end.
Ok, now let’s jump to the BackEnd.
Location: routes.js
All that FrontEnd javascript is useless unless it can talk to something in the BackEnd. The code is well commented, so combined with the diagram I’ve drawn above, it should be possible for you to tease out what’s going on- but let me draw your attention to a few important points.
Google auth
The code between lines 5–36 is mostly taken directly from Google’s guides. What I’ve added is some comments and the code needed to get a user’s details from their token. AS you can see this info is stored in the ‘payload’.
/Home
This is the route that allows you to type localhost:80/Home and you actually see something. You can see the mechanics are fairly simple. If this request is sent to the BackEnd, it finds the homepage_file and sends it back in a response. In other words, it tells the browser to display the file.
/SignIn
You can see on line 57 we pick up the SignIn post request that was sent on the FrontEnd. The forward slash you see here is actually what’s in the browser’s URL.
Basically what happens here is that we use the verify function that we defined above. This tells us whether the token which was sent from the FrontEnd is valid. If it is in fact valid, we first of all set this token as a cookie on the browser. This is important because we will use this cookie for basically everything else we do from now on.
Next we get all the user data- again from that verify function. Then we check whether anyone with that google_user_id already exists in the user_profile database. If they do, we just send a response telling the FrontEnd the user already exists, if they don’t, then we insert all their data into the user_profile database. Each user has one row, identified by their unique google user id, however we also use the row number to generate their app ID. So the first google user id is associated with app user 1 and so on.
/ProfileRoute
This route gets triggered after a user presses the My Profile button. As mentioned above, this executes the ProfileRoute function on the FrontEnd. This BackEnd link then first validates the the token sent by the ProfileRoute function. Next it uses the verify function to get the user’s google Id and then users that Id in turn to find the user’s app Id.
A Note on IDs
We use two IDs in this project. A user’s Google Id is generated from the id_token that we get when the user signs in via google sign in. When this token gets verified on the BackEnd, part of its payload is the user’s Google Id. But it’s better to not have those IDs on display, instead a user (and their profile) should have an app ID. This ID is generated when they first sign in- user 1 is the first user to sign in. The two IDs are linked in the user_profile table and we use that fact in the security logic later.
/ProfileRoute [ctd…]
Once the corresponding app user Id has been found, we ping pong back to the FrontEnd for redirection. As written above, if the token has been successfully verified, the user is redirected to ProfileUrl.
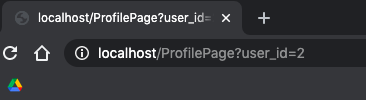
/ProfilePage
If you read the code for ProfileUrl, you’ll see that it is basically three parts 1) localhost + 2) /ProfilePage + 3) ?user_id=. All our requests will have the first part; the second part identifies the relevant route on the BackEnd. The third part is called the parameter — it allows us to send a user Id with the request.
And again, you can do this manually by just typing this URL into your browser. And indeed this is how you would look at your friend’s profile- they send you their user Id and you add it to the end of the URL.
As you can see in the code, /ProfilePage users the user_id found in the request query and uses it to find the relevant row in the user_profile table. It then takes all the data from this row (name, profile picture etc.) and sends it along with the profile page itself:
response.render("ProfilePage.ejs,{...});
Note: What is EJS?
EJS is a ‘templating engine’: It creates files — templates — that look very similar to a normal HTML file, except for certain parts, which are placeholders that can be dynamically updated and changed. It’s a very basic version of things like react, which are commonly used in professional settings. An EJS file is ‘rendered’ and can be rendered with an array of data, like you can see on lines 143–146 above. These individual pieces of data will be ‘slotted in’ in the relevant places in the ProfilePage.
Note also, that by default, the server will look for your EJS files in a folder called ‘views’- so make sure to follow this folder structure (you can see my folder structure in my git repo).
Location: ProfilePage.ejs
Below is the ProfilePage.ejs file. For simplicity I have deliberately removed the CSS styling and some Javascript functions- well come back to that later. What do you need to know here?
Notice on some of the lines we have funny % tags, like on line 16:
<%=data.name%>
This is the ‘slot’ I mentioned above. Into this slot goes the data that was sent from the BackEnd on lines 143–146. In this case, the user’s name.
A few other interesting things to point out: We define the same GetCookieFunction as before and use it the same way as before. We get the ID of the profile page- which as we know is synonymous with a user ID with the code:
var urlParams = new URLSearchParams(window.location.search); var user_id = urlParams.get('user_id);
Finally, we do a request to load the video content associated with that user/profile ID. That route is defined on line 163 on the BackEnd, above.
8.2: Edit a profile
Location: ProfilePage.ejs
This diagram summarises the main points in the code and described below the code.

Click here for full diagram
Still on the profile page and still in the Javascript section, write in the following code. Below I explain what it does.
The Owner Route
The purpose of this route is to check whether the page being displayed is ‘owned’ by the user. We do this by comparing two things: The ID of the page, which is also the ID of the user, and can be found in the browser URL.
Like basically any social media site, anyone can view any page by simply changing the URL- in practical terms this allows a user to send their friend, who is not a user, the link of their page. It also means any user can see any other user’s page.
The URL gives us the page/user ID. We want to then compare this ID with the the ID from the user who is logged in (assuming they in fact are logged in). As we’ve seen before, the logged status of a user is managed by the Google Token, which we’ve stored as a token in the SignIn Route. Taken together we can compare the user ID of the page being viewed with the associated Google ID of the signed in user. If they match, then the ‘owner’ of the page is viewing the page and thus we grant them editing rights in the form of unhiding the Add YouTube video box.
The Add Video Route
The purpose of this route is to enable the user to populate her page with content. Specifically in this case a YouTube video (though in reality there’s nothing stopping a user putting anything else).
The mechanics of this are simple: We retrieve the data submitted by the user on the form in the FrontEnd, and send this ‘VideoLink’ along with the token and ProfileId. The VideoLink is then added to the user_content table, on a row corresponding to the ProfileId.
The specifics of this are a little more involved however. Notwithstanding the security given through the Owner route (above) -which ensures the ability to edit a page remains ‘hidden’ unless the user if the profile ‘owner’- we want to add a second layer of security, by double checking that the user is indeed the correct owner of the page and that she has the right to POST data to the BackEnd for that profile. Fortunately the logic of this is exactly the same as the logic seen in the Owner route- we compare the ProfileId with the Google Id taken from the verified token. If the Stored Google Id which corresponds to the ProfileId matches with the token Google Id then the user owns the profile and thus is allowed to edit it.
8.3: Sign out
We’re not going to take long, here. If you’ve understood the last few sections, this’ll be easy.

Click here for full diagram
Location: Homepage.html
Location: routes.js
The basic flow here is that the user clicks SignOut, that sends a request to the SignOut route on the BackEnd. This route deletes the USER_SESSION_TOKEN cookie stored in the browser, which effectively removes all ‘sign in’ rights the user had. Once done, we get bounced back to the FrontEnd, which in turn redirects us to the LoggedOutPage route on the backend. This route renders the LoggedoutPage EJS file.
Location: LoggedOutPage.ejs
This page isn’t really necessary, so we will just quickly make a file in the views folder as below:
Last step: Polishing with CSS
As a last step we’re going to add CSS to add things like backgrounds and put all the objects in the right place. CSS should be put in <style> tags in the body of your html code. See the styling for homepage and profile below
Location: Homepage.html
Location: ProfilePage.ejs
9. A PRETTY FACE: HOW IT SHOULD ALL LOOK
You can download the final version of all the code from my Github repo here, also are are the individual files listed, if you’re less comfortable with Git


9. APPENDIX: FURTHER READING & RESOURCES
How I learned (good guides you can read alongside this/after this)
Setting up a server
The resource I keep going back to for getting started with using a server and making simple requests is this three part post:
This YouTube guide is a good walk-through after going through the above post.
Javascript and jQuery
If you can get past this guy’s hair, this is a really great (and short!) tutorial about how jQuery works.
Using Google Sign in
Google Docs: Authenticating a user ID token with Google sign-in
Bootstrap
Is a framework for easily building professional looking websites. You can read more about it here- CodeAcademy also have some good lessons on it.
SQL injection (security)
Short video on how to prevent SQL injection hacking. (Here too)
Good simple example of how sql injection works
Getting your site up and running on the actual internet is beyond the scope of this post, but if you do go on to host your website on a server (AWS, Digital Ocean etc.) you’ll almost certainly need an SSL key. It took me a really long time to understand how to get this, but once I watched this video it became very clear for me

